OpenWRT: Build Your Own LTE Router
01.09.2023 yahe administration hardware linux
Within the next months I want to connect a remote location to the internet which only has a power connection but no telephone access whatsoever. I already thought about buying some ready-made LTE router when I learned that OpenWRT supports tethered LTE network access via iPhones.
Thankfully, I had an old iPhone 8 and an unused TP-Link TL-WR1043ND v4 lying around so that I could try everything out without buying any equipment. While setting everything up I used several sources including the primary smartphone USB-tethering user guide but modified some parts as the user guide was either misleading or plain outdated.
1. Install required packages
First of all, I started with a fresh OpenWRT installation by updating to the newest release and dropping the previous configuration. Then I installed the required packages. Some of them might not be necessary but as they don't take up a lot of space they do not hurt:
opkg update
opkg install kmod-usb2 kmod-usb-net kmod-usb-net-cdc-ether kmod-usb-net-ipheth kmod-usb-net-rndis libimobiledevice libimobiledevice-utils libusbmuxd usbmuxd usbutils
2. Start usbmuxd
usbmuxd is the central USB handling daemon which needs to be started manually. To have usbmuxd started after every reboot, we also add it to /etc/rc.local:
# Call usbmuxd
usbmuxd -v

# Add usbmuxd to autostart
sed -i -e "\$i usbmuxd" /etc/rc.local
3. Connect the iPhone to the router
Now is the right time to connect the iPhone to the router. Make sure that the iPhone is unlocked so that you can trust the connected router. You should also make sure that the personal hotspot is activated in the configuration. Trusting the router in iOS creates a trust binding that is stored in plist files which will be located in /etc/lockdown. Previously, these lock files needed to be restored with every reboot, but this is not necessary anymore. After connecting the iPhone to the router and trusting the device you should see that a connection to the personal hotspot has been established.
According to the user guide, the personal hotspot is deactivated once the iPhone has been locked for an hour. To circument this limitation you have to enable the option that devices can be trusted from the lockscreen. This deactivates the time limit. Go to Settings -> Touch ID/Face ID & Passcode -> USB Accessories and switch this toggle to On. Unfortunately, this setting is rather insecure and anyone would now be able to connect your iPhone to malicious devices so this should only be done with a spare iPhone that you do not use to handle personal data.
4. Implement a watchdog
According to the user guide the tethered connection can be lost from time to time which is why you should have some watchdog that checks the connection and resets it if necessary. Thankfully, the personal hotspot uses a standard IP address range which we can check by simply pinging it. We execute the watchdog script every minute via CRON. To do this we need to add the script to /etc/crontabs/root:
cat << "EOF" > /root/wan4g-watchdog.sh
#!/bin/sh

# If we see the iPhone ethernet interface, we try to ping the iPhone's router address (172.20.10.1).
# When the ping is unsuccessful, we rebind the iPhone ethernet USB driver and wait for things to settle down.
for i in /sys/bus/usb/drivers/ipheth/*:*
do
  test -e "${i}" || continue
  ping -w 3 172.20.10.1 &> /dev/null
  if [ "${?}" -ne 0 ]; then
    echo "${i##*/}" > "${i%/*}"/unbind
    echo "${i##*/}" > "${i%/*}"/bind
    sleep 20
  fi
done
EOF

# make the script executable
chmod +x /root/wan4g-watchdog.sh

# execute the script every minute
cat << "EOF" >> /etc/crontabs/root
* * * * * /root/wan4g-watchdog.sh
EOF
5. Create the WAN interface
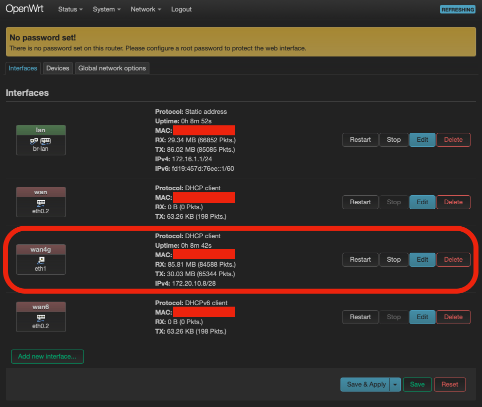
Now it is time to create the WAN interface. I did this through the web interface as is described in the user guide. On my device the physical interface was named eth1 which seems to be typically the case for iOS devices. I left most of the other settings unchanged. However, make sure that you add the new WAN interface to the WAN firewall zone!
6. Reboot the router
Finally, it is time to check that everything works so go ahead and reboot your router. After the reboot you should see that the router reconnected to the smartphone and the iPhone should show that a connection to the personal hotspot has been established. In the interface overview you should also see that the new WAN interface got an IPv4 address assigned from the 172.20.10.0/28 range.
7. Success!
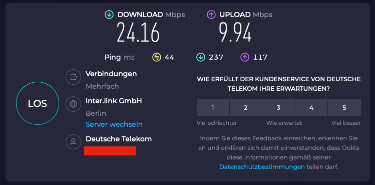
When you now connect a computer to the router and try to access the internet this should just work and you should see that the traffic is counted against the new WAN interface. At least in my region the provided speed is decent enough for daily work.


